[ friend link to this article in case medium is limiting you: https://bit.ly/3FcXhg0 ]
Intro
This walkthrough will split up lines into separate functions, making the code around 30 lines, but since the functions and variables will (mostly) be only used once, you can always collapse them down and not define the functions at all, and a smaller 17 line version will be included at the end of the article.
What we’re going to do is iteratively refine a 512x512 pixel grid to match a text prompt, using CLIP semantic embeddings. CLIP is a neural network from OpenAI that aims to embed similar images and text pairs into similar vector space (i.e. a photo of a plane will be similar to the text “a plane”). By using gradient descent on the raw pixel data and it’s embedding, we can make it match any specified text embedding.
This has already been done countless times and the proprietor of the technique is @advadnoun on twitter, while notable programs including BigSleep, and countless guided diffusion and vqgan vector optimization techniques popularized it.
Concept
feel free to try and code this up while reading, before getting to the actual code explanation!
SIMPLIFIED:
We’re going to encode some text as our target vector.
Create an image, then compare that image’s encoded vector against our target.
Calculate error and use a torch optimizer to backward through and reduce the error.
Code
Installing CLIP
Installing CLIP is pretty damn easy especially in a Google Colab Notebook, where the command is as simple as
pip install git+https://github.com/openai/CLIP
other installation guides are available at the Github link.
Imports
from tqdm.notebook import trange
import torch
from torchvision import transforms
import clip
this is all the imports we’re gonna need
Variables
device ='cuda'
cutn =  16
shape = (256, 256)
lr = 0.03
steps = 500
clip_model = "ViT-B/32"
prompt = "a rainbow flower"
“device” — denotes if we’re using an Nvidia graphics card or not (‘cuda’ for yes, otherwise use ‘cpu’)
“cutn” — how many augmentations of our input image we’re going to show to clip (having more than one is better, because otherwise it will start to exploit clip’s flaws, and create something that looks just like noise but scores good for embedding similarity)
“shape” — the height and width of the image
“lr” — learning rate our optimizer will use
“steps” — how many times we will improve the image.
“clip_model” — set to ViT-B/32 because in my experience, that’s the best one for creating images this way. Others include ViT-B/16, ViT-L/14, RN50, RN101, RN50x4, RN50x16, and RN50x64
“prompt” — whatever you want! I chose a rainbow flower because it’s something easier for the model to grasp, but also a little bit abstract because I don’t say exactly where it is or what type of medium is depicting it.
Functions and Functional Elements
image=torch.rand((1, 3, shape[0], shape[1]), device=device, requires_grad=True)
opt=torch.optim.Adam((image,),lr)
f=transforms.Compose([lambda x:torch.clamp((x+1)/2,min=0,max=1),transforms.RandomAffine(degrees=60, translate=(0.1, 0.1)),transforms.RandomGrayscale(p=0.2),
transforms.Lambda(lambda x: x + torch.randn_like(x) * 0.01),transforms.Resize(224)])
m=clip.load(clip_model, jit=False)[0].eval().requires_grad_(False).to(device)
embedding=m.encode_text(clip.tokenize(prompt).to(device))
def total_variation_loss(img):
yv = torch.pow(img[:,:,1:,:]-img[:,:,:-1,:], 2).sum()
xv = torch.pow(img[:,:,:,1:]-img[:,:,:,:-1], 2).sum()
return (yv+xv)/(1*3*shape[0]*shape[1])
def spherical_distance_loss(x, y):
return (torch.nn.functional.normalize(x, dim=-1) - torch.nn.functional.normalize(y, dim=-1)).norm(dim=-1).div(2).arcsin().pow(2).mul(2).mean()The first two lines define our image and our optimizer.
The next line creates the thing that will augment our images, using torchvision transforms.
Next we download/load our CLIP model, and create our text embedding.
The last two functions are for calculating losses, the first one tells us how “smooth” our image is, and the next tells us how far away our image is from our text embedding. The smoothness is necessary because otherwise the image may look way too much like noise, and it will be more likely to try and mess with CLIP’s flaws to create a noisy but high scoring image instead of a smooth natural high scoring image.
Optimization
for i in trange(steps):
    opt.zero_grad()
    clip_in = m.encode_image(torch.cat([f(image.add(1).div(2)) for _ in range(cutn)]))
    loss = spherical_distance_loss(clip_in, embedding.unsqueeze(0)) + (image - image.clamp(-1, 1)).pow(2).mean()/2 + total_variation_loss(image)
    loss.backward()
    opt.step()
The first line creates a loop that repeats every bit of code after it for however many steps we provided (and using trange instead of range, a progress bar will show in the console! we imported this in the imports section)
The second line “provides more freedom on how gradient is accumulated and applied by the optimizer in the training loop” whatever that means.
The third line embeds our image into the same type of vector our text embedding is, so we can compare them in the next line… where they’re compared. Also in the next line we add a “range loss” (making sure the image is in the values we need it to be) and the total variation loss, that’s opposite to our “smoothness,” any value that’s high is penalized by this, that’s “Loss”.
The last two lines use the Adam optimizer to change the image in a way that will make the loss go down
Visualization
transforms.ToPILImage()(image.squeeze(0).clamp(-1,1)/2+.5)that’s it if you’re in a notebook environment! if you’re in a console only environment, then slap a .save("filename.png") on the end of it to save the image.
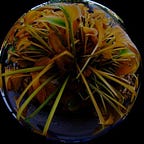
Results!
There’s our result for “a rainbow flower,” not too great, but crazy you can do that in 17ish lines right? Messing around with the variables at the beginning might give you better results, this is by no means optimized.
here’s the finished code in notebook form that you can run online, without having expensive hardware yourself!
EDIT:
with the addition of pyramids along with a little prompt tuning, here’s an updated rainbow flower and code to reproduce

- crumb